Wednesday, December 5, 2018

الجزء الثاني: كيف تنشر صفحة أو موقع ويب قمت بتصميمه على الإنترنت

أنشأنا في الدرس السابق موقع الويب الأوّل لنا، سنتعلّم الآن كيف سننشر موقع الويب هذا بشكل فعليّ على الانترنت.
publish-website.thumb.png.61f5c88c72036a
ملاحظة: لن يكون هناك الكثير من الزوار لموقعك في البداية، مالم تعط الناس عنوان الموقع على الانترنت.

الاستضافة

لكي يستطيع الجميع الوصول إلى موقعنا على الانترنت، نحتاج إلى مُخدّم Server يُخزّن موقعنا عليه، بالإضافة إلى عنوان URL يُشير إلى الموقع.
هناك عدد هائل من الشركات التي يمكن أن تقدّم لك خدمة تأجير مساحة على المُخدّم لهذا الغرض. تُسمّى هذه الخدمة عادةً باستضافة ويب Webhosting.
نستعرض بعض الاستضافات المجّانية المُتاحة. أنصح أن تبدأ بخدمة BitBalloon إذا كانت هذه هي التجربة الأولى لك.

1- الاستضافة على BitBallon

bitballoon-logo.thumb.png.1d5cdac84f70f7
خدمة BitBallon بسيطة ورائعة وأنصح بها. إليك الخطوات اللازمة للتسجيل:
1. اشترك ضمن موقع BitBalloon. وذلك بالنقر على زر التسجيل Sign Up ثم اختر Sign in Using Persona. بعد ذلك أدخل بريدك الإلكتروني وكلمة المرور.
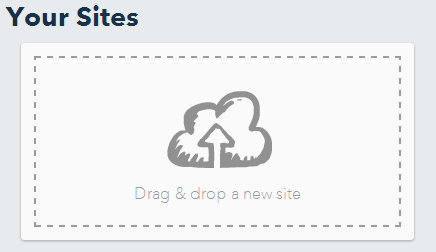
2. عندما تسجّل الدخول، يمكنك ببساطة سحب كامل مجلّد موقع الويب (المجلّد Portfolio) إلى المكان المخصّص في صفحة الخدمة. 
bitballoon-drag-and-drop.thumb.png.a3c3a
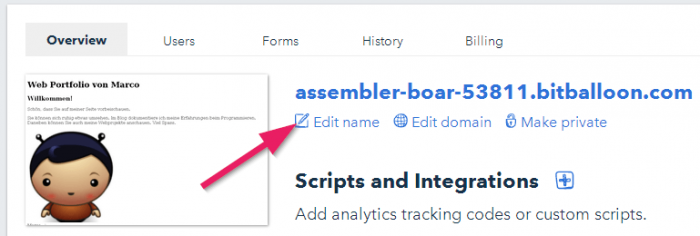
3. ربما تستغرب هذه البساطة، ولكن بمجرّد تحميل الموقع سيُولّد عنوان URL يُشير إلى موقعك الذي حمّلته قبل قليل. انقر هذا العنوان واختبر ظهور الموقع بشكل صحيح.
4. لتبسيط عنوان URL المولّد بشكل آلي، يمكننا النقر على Edit name وإدخال اسم مناسب. 
bitballoon-published.thumb.png.419d52c13
5. من أجل التحديثات التي من الممكن أن تجريها على الموقع، اسحب مجلّد الموقع من جديد إلى الصندوق المسمّى Drag & Drop to Update your Site.

2- الاستضافة على Google Drive

google-drive-logo.thumb.png.45f763b69d4a
يمكن استخدام خدمة Google Drive كخدمة استضافة. الأمر السلبي الوحيد هنا، هو أنّك ستحصل على عنوان URL طويل جدًّا. لنجري الخطوات التالية للاستضافة:
  • حمّل مجلّد الموقع إلى Google Drive.
  • حدّد المجلّد المُحمّل ثم اختر مشاركة Share. انقر فوق خيارات متقدّمة Advanced وغيّر مستوى الوصول إلى Public on the web أي متاح للعموم على الانترنت.
  • افتح المجلّد في Google Drive وتأكّد من أنّ جميع ملفّات الموقع قد حمّلت (index.html والصور …الخ).
  • انسخ الرموز التي تأتي بعد الكلمة ( /folders#) ضمن شريط العنوان للمتصفّح. ستكون هذه الرموز هي المُعرّف الخاص بالمجلّد المُحمّل. 
google-drive-copy-string.thumb.png.666b6
  • أدخل في شريط العنوان للمتصفّح العنوان التالي http://googledrive.com/host متبوعًا بالرموز التي نسختها من الخطوة السابقة.
google-drive-host-address.thumb.png.0ba1
يمكن الآن لأي شخص لديه هذا العنوان الوصول إلى موقعنا.

3- الاستضافة على Dropbox

dropbox-logo.thumb.png.cf5b3516881d2c159
يمكن استخدام Dropbox كخدمة استضافة. ولكي نتمكّن من ذلك نحتاج إلى خدمة إضافية لتوجيه الطلبات إلى الموقع المُستضاف. توجد خدمتان يمكن استخدامهما وهما Pancake و DropPages.

4- الاستضافة على GitHub

github-logo.thumb.jpg.84bd4a0fa674ed071d
إذا كان لديك بعض الخبرة البرمجية فعندها يُعتبر GitHub طريقةً رائعة لاستضافة مواقع الويب. تُعتبر GitHub منصّة لتسهيل التشاركية بين المبرمجين، كما تُتيح هذه المنصة استضافة مجّانيّة لصفحات الويب وذلك على صفحات GitHub. تؤمّن صفحات GitHub المزيد من الخيارات (فمثلاً تستطيع استخدام النطاق domain الخاص بك)، لكنها تتطلّب بعض المهارات في التعامل مع نظام التحكم بالإصدارات البرمجية Git.

تصغير عناوين URL

يمكن أن يكون عنوان موقعك طويلًا جدًّا وذلك بحسب الاستضافة التي اخترتها. توجد بعض الخدمات البسيطة لتصغير عنوان URL الخاص بموقعك. لتصغير العناوين فائدة كبيرة، حيث يمكن إدخالها يدويًا بسهولة ضمن متصفح الويب في هاتفك الذكي مثلًا، كما توجد بعض الخدمات التي تزوّدك بكود QR للوصول السريع من هاتفك الذكي إلى الموقع مباشرة باستخدام كاميرا الهاتف فحسب. إليك قائمة من بعض خدمات تصغير العناوين:

النطاق الخاص بنا

ربما يأتي يوم نرغب فيه بأن نحصل على اسم نطاق خاص بنا مثل http://www.my-super-website.com. يمكنك في بعض الحالات تسجيل اسم نطاق ضمن مزوّد خدمة الاستضافة نفسه (كما هو الحال مع خدمة الاستضافة BitBallon). أو يمكنك الوصول إلى عدد كبير جدًّا من خدمات تسجيل النطاقات الخاصة، تقدّم بعضها عروضًا مختلفةً عن بعضها الآخر، يمكنك البحث في Google لتصل إلى عدد كبير منها.

الجزء الاول: كيف تصمم أول صفحة ويب لك

سنتعلّم مبادئ HTML و CSS لإنشاء مشاريع ويب خاصة بنا. سيتميّز هذا الدرس بتركيزه على الجانب العملي بشكل كبير، حيث سنبدأ فورًا بإنشاء مشروع خاص بنا.
html-css-part1.thumb.png.16c196804c84ab5
أمّا بالنسبة للنواحي النظرية فسنشرحها عند الحاجة أثناء تقدّمنا ببناء المشروع. بهذه الطريقة سنكتسب أساسًا متينًا وسريعًا في مجال تطوير الويب. سأوجّهك خلال هذا المشروع إلى روابط خارجية تُشير إلى مصادر أخرى للتوسُّع في نقاط معيّنة إن أحببت ذلك.

المشروع

سيكون المشروع عبارة عن بناء ملف شخصي portfolio على الويب. سيضم صفحة بداية Home ومدوّنة Blog وصفحة تُظهر مشاريع ويب المستقبلية التي تنوي إنشائها Projects، بالإضافة إلى صفحة للتواصل Contact. 
portfolio.thumb.png.925ce6326288e6809042

الهدف من المشروع

الهدف منه هو جعلك تدخل عالم برمجة الويب ومساعدتك كي تتعلّم كيفية إيجاد المزيد من المعلومات حول أي موضوع لوحدك. ستصبح قادرًا بعد ذلك على معالجة مشاريع ويب أكثر تعقيدًا.

ما هو HTML و CSS؟

لغة الرُماز المعلَّم Hypertext Markup Language والتي ندعوها اختصاراً HTML هي لغة مسؤولة عن بُنية structure صفحة الويب. فمثلًا يمكنك تعريف عناوين headings وفقرات paragraphs ونصوص texts وصور images في HTML.
أمّا بالنسبة لأوراق الأنماط المتتالية Cascading Style Sheet وندعوها اختصاراً CSS فهي مسؤولة عن تنسيق (تنميط) style وتخطيط layout صفحة الويب. يمكنك تعريف تنسيقات جديدة خاصة بالألوان والخطوط وطرق المحاذاة وحتى يمكنك إنشاء بعض التحريكات animations البسيطة في CSS.
تذكّر: تزوّدنا HTML بالمحتوى في حين تُنسّق CSS هذا المحتوى.

موقع ويب أم تطبيق ويب

يمكننا بناء مواقع ويب websites معقّدة جدًّا باستخدام HTML و CSS فحسب. لكن ستكون مواقع الويب هذه ساكنة static، ويعني ذلك أنّ زوّار الموقع يمكنهم استعراض الصفحات لكنّهم لا يمكنهم التفاعل مع هذه الصفحات (باستثناء النقر على الروابط الموجودة في الصفحات).
لبرمجة مواقع ويب ديناميكية dynamic تكون تفاعلية مع المستخدم، سنحتاج إلى لغة برمجة إضافية مثل JavaScript أو Dart. ويمكننا باستخدامهما تطوير (هو مفهوم أوسع من البرمجة) تطبيقات ويب Web Applications كاملة مثل التطبيقات التي تهتم بإجراء الحسابات المختلفة أو تطبيقات الألعاب أو تطبيقات المحادثة وغيرها الكثير. تعمل هذه التطبيقات في الواقع ضمن متصفّح الويب. كما توجد لغات برمجة وتقنيات أخرى مثل PHP وRuby وASP.NET تسمح ببناء تطبيقات ويب ديناميكية أيضًا ولكن تعمل هذه التطبيقات ضمن مزوّد خدمة الاستضافة (على المخدّم). كما يمكن المزج بين هذين الأسلوبين لإنشاء مواقع ويب فعّالة للغاية. يمكنك بعد الانتهاء من هذه الدروس، البدء بتعلّم مثل هذه اللغات والتقنيات وإنشاء تطبيقات ويب ديناميكية.

الأجهزة المحمولة

يُشكّل الوصول إلى مواقع الويب عن طريق الأجهزة المحمولة كالهواتف الذكيّة أو الأجهزة اللوحية نسبة كبيرة من عمليات الوصول العامة. وهكذا فإنّه من الضروري أن يظهر موقعنا بشكل جيّد على الشاشات الصغيرة. على العموم سنولي هذا الأمر اهتمامًا خلال هذه السلسلة التعليمية.

الأدوات المستخدمة

نحتاج إلى تطبيقين للدخول في عالم تطوير وبرمجة الويب، محرّر نصوص لإنشاء الملفات الخاصة بموقع الويب، ومتصفّح ويب لعرض وتجربة الموقع.

1- المحرر Editor

سيكون كافيًا استخدام محرّر نصوص عادي (كبرنامج المفكرة Notepad في ويندوز مثلًا). ولكن من الأفضل استخدام محرّر نصوص يسهّل عملنا إلى حدٍّ كبير. لهذا الغرض أنصح باستخدام محرّر نصوص عصري ومخصّص لتحرير HTML. 
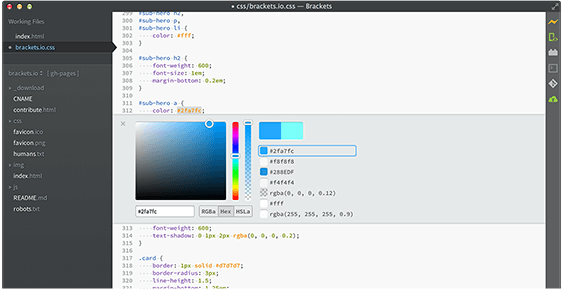
brackets-editor-screenshot.thumb.png.bf3
محرّر النصوص الذي أنصح به حاليًا هو Brackets (مجّاني من شركة أدوبي Adobe). يمكنك أن تستخدم أي محرّر تريده، ولكنّني في هذه السلسلة سأُشير أحيانًا إلى بعض وظائف تطبيق Brackets. يوجد محرّر نصوص جيّد أيضاً ويمكنك استخدامه وهو Atom، ويوجد محرّر نصوص آخر أيضًا، قديم قليلًا لكنّه جيّد وهو ++Notepad
brackets-editor-logo.thumb.jpg.72a879519
حمّل ونصّب المحرّر Brackets إذا أردت ذلك.

2- المتصفح Browser

يتوجّب على موقعنا أن يعمل على جميع المتصفحات الرئيسية بالطبع (Internet Explorer و Firefox و Chrome و Safari). على أية حال، أنصح باستخدام المتصفح Chrome لأغراض التطوير والبرمجة. يضم Chrome أدوات مفيدة للغاية لمطوّر الويب والتي سيستخدمها على نحو متكرّر. بالإضافة إلى ذلك، يدعم المحرّر Brackets المتصفّح Chrome بشكل جيّد، بحيث أنّ التغييرات التي تحدث في النص ستظهر مباشرةً ضمن Chrome (عن طريق ميزة اسمها Live Reload). 
chrome-logo.thumb.png.43fd884182677254aa
حمّل ونصّب المتصفح Chrome الآن من هنا.

إنشاء مستند HTML

لنبدأ الآن بإنشاء مستند HTML الأوّل لنا من أجل موقع الويب:
  1. أنشئ مجلّدًا من أجل المشروع. سمّ المجلّد بالاسم Portfolio (أو أي اسم آخر ترغبه).
  2. افتح برنامج Brackets.
  3. من القائمة File اختر الأمر …Open Folder لتحديد وفتح المجلّد الذي أنشأناه قبل قليل. 
open-folder.thumb.png.3d0ec8f22e7e1236a0
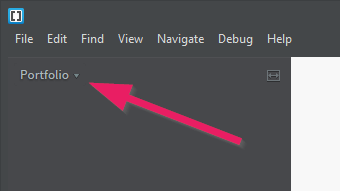
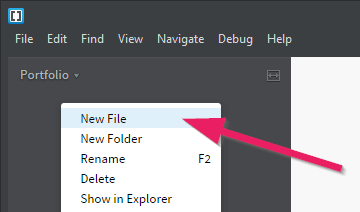
انقر بزر الفأرة الأيمن أسفل اسم المجلّد واختر New File لإنشاء ملف جديد، سمّه index.html. 
new-file.thumb.png.247198b5297d229602b0e
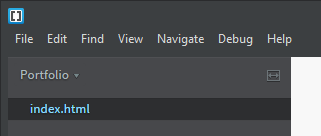
لديك الآن ملف نصّي فارغ اسمه index.html
new-index-file.thumb.png.b9cf522f7715a37

لماذا الملف index.html؟

في الواقع للملف index.html معنى خاص، فعندما نطلب من المتصفّح عنوان موقع ويب ما، وليكن مثلًا http://code.makery.ch، فعند ذلك سيُعرَض الملف index.html أولاً بشكل تلقائي، أي كأنّنا طلبنا العنوان http://code.makery.ch/index.html. بالنسبة إلينا، سيمثّل الملف index.html الصفحة الرئيسية.

عمليتا العرض والتحديث

يمكننا الآن تعبئة مستند HTML (الملف index.html) بالمحتوى. اكتب الأسطر التالية ضمن مستند HTML. 
first-website-de.thumb.png.55cc62ea7f69d
لعرض الصفحة ضمن المتصفّح، انقر الأيقونة التي تُشبه البرق في الطرف الأيمن من البرنامج (المعاينة الحية Live Preview). سيُفتَح المتصفّح Chrome وسيُعرض المستند ضمنه، وفي حال أجريت أي تغيير جديد على مستند HTML فسترى نتيجة ذلك على المتصفّح مباشرةً، وهي في الحقيقة ميزة هامة وفعّالة.
إذا لم تظهر الصفحة، اذهب إلى المكان الذي يوجد فيه الملف index.html وافتحه مباشرةً باستخدام Chrome أو أي متصفّح آخر. أمّا لم تُحدّث الصفحة تلقائياً، فاحفظ جميع الملفات المفتوحة (سننشئ ملفات أخرى تباعاً) ثم من نافذة المتصفح اضغط F5 على لوحة المفاتيح.
تهانينا، لقد أنشأت موقع ويب الأوّل الخاص بك.

التحييد Indentation

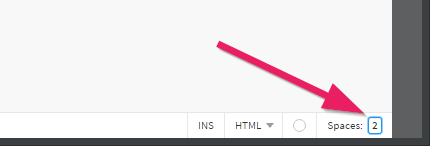
لكي نُبقي الشيفرة نظيفة وواضحة، من المهم أن تعمل على تحييد النص بشكل صحيح باستخدام مفتاح الجدولة Tab من لوحة المفاتيح. يأخذ مفتاح Tab في برنامج Brackets أربعة فراغات بشكل افتراضي. بالنسبة لي أجد ذلك كثيراً بعض الشيء، لذلك أنصح أن تغيّر هذا لتصبح الفراغات spaces التي يأخذها المفتاح Tab تساوي 2، وذلك من أسفل نافذة Brackets. 
brackets-spaces.thumb.png.30e17882e7528f
من المهم جدًّا أن ننتبه إلى تحييد الشيفرة من البداية، لكي نكتب شيفرة نظيفة وواضحة من بداية تعلّمنا للبرمجة عموماً.
تلميح 1: استخدام Shift+Tab لكي تنقل المحاذاة إلى اليسار بدلاً من اليمين.
تلميح 2: يمكنك محاذاة عدة أسطر بنفس الوقت إذا اخترتهم وضغطت Tab أو حتى Shift+Tab.

عناصر HTML

1- الوسوم Tags

في المثال السابق رأيت رموزًا مكتوبة ضمن رمزي <> تشكل هذه الرموز كلمات نُسميها الوسوم Tags. تتألف عناصر HTML عادةً (ولكن ليس دائماً) من وسمين، وسم للفتح opening tag ووسم للإغلاق closing tag. في مثالنا السابق كان <html> هو وسم للفتح، أمّا <html/> هو وسم للإغلاق حيث نلاحظ وجود محرف slash قبل اسم الوسم.
أي نص موجود بين وسمي الفتح والإغلاق يُعتبر محتوى لعنصر HTML هذا. فمثلاً بالنسبة للوسمين <html> و <html/> نُخبر متصفّح الويب عن بداية ونهاية مستند HTML لصفحة الويب الخاصة بنا.
أمّا الوسم الثاني الذي صادفناه هو الوسم <body>. يُحدّد هذا الوسم أنّ جميع المحتوى الواقع بين وسم الفتح <body> والإغلاق <body/> سيظهر بشكل مرئي للمستخدم في المنطقة الرئيسية من نافذة المتصفّح.

2- السمات Attributes

تُعرّف السمات معلومات إضافية لعنصر HTML. وتقع هذه السمات ضمن وسم الفتح لعنصر HTML، ويكون لها دائماً اسم name وقيمة value.
كمثال على السمات، دعنا ننظر إلى عنصر HTML الخاص بالروابط. وهو ربما من أهم العناصر على الإطلاق. 
html-element-attribute.thumb.png.e45febc
يضم عنصر الروابط <a> السمة href (وهي اختصار للكلمتين hypertext reference) التي تحمل القيمة في هذا المثال http://code.makery.ch.ولكن سيعرض المتصفّح هذا الرابط على شكل النص التالي: My Website.

البنية الأساسية لصفحة HTML

لقد رأينا قبل قليل عنصري HTML وهما <html> و <body>. ولكن بنية صفحة (مستند) HTML تتكوّن عادةً من المزيد من العناصر. استبدل محتويات الملف index.html بالشيفرة التالية، بعد ذلك سنناقش كل عنصر HTML موجود فيها.

بنية ملف (مستند) HTML

<!DOCTYPE html> 
<html> 
  <head> 
    <meta charset="utf-8"> 
    <title>Web Portfolio of Marco</title> 
  </head> 

  <body> 
    <h1>Web Portfolio of Marco</h1> 
    <p>Write anything you want to tell the world.</p> 
  </body> 
</html>

الشرح

  • نضع في السطر الأوّل <DOCTYPE html!> دوماً. فهي تخبر المتصفّح عن نوع المستند.
  • يشير الوسم <html> إلى بداية المستند والوسم <html/> إلى نهايته.
  • يحتوي العنصر <head> (بين وسمي الفتح والإغلاق له) على معلومات إضافية حول الصفحة. وبشكل مختلف عن العنصر <body>، لا تظهر هذه المعلومات في نافذة المتصفح الرئيسية.
  • يجب أن تكون هناك إشارة ضمن العنصر <head> حول الترميز character set المستَخدَم في هذا المستند: <"meta charset="utf-8>. إذا لم تحدّد الترميز المستَخدَم فإنّ بعض الرموز قد لا تظهر بصورة صحيحة. ربما قد لاحظت أنّ العنصر <meta> لا يمتلك وسم إغلاق. توجد بعض عناصر HTML التي لا تمتلك أيضًا وسوم إغلاق، ولكنها تعتبر استثناءً.
  • نرى بعد ذلك الوسم <title> الذي يضم عنوان المستند والذي سيظهر على شريط العنوان لنافذة المتصفّح.
  • كل شيء ضمن الوسم <body> سيظهر ضمن نافذة المتصفّح الرئيسية.
  • يُعرّف العنصر <h1> العنوان الرئيسي الذي سيظهر للمستخدم ضمن صفحة الويب. ويمكن إنشاء عناوين فرعية أيضاً باستخدام العناصر <h2> <h3> <h4> <h5> <h6>.
  • النص الموجود بين الوسمين <p> و <p/> يُعتبر فقرة مستقلة، وهذا ما يُعبّر عنه العنصر <p>.
  • بعد كل وسم فتح لعنصر ما، يجب أن نحاذي العنصر التالي (بمفتاح الجدولة Tab) لتحسين عرض الشيفرة. ورغم أنّ ذلك ليس ضرورياً ولا يؤثّر أصلاً في عرض المستند، ولكن تأكّد من امتلاكك لهذه العادة الجيّدة.
تلميح 1: يمكنك استخدام بنية HTML السابقة لأي صفحة HTML جديدة.
تلميح 2: استخدم الاختصار Ctrl+S من لوحة المفاتيح لحفظ الملف الحالي.
تلميح 3: استخدم الاختصار Ctrl+Z من لوحة المفاتيح للتراجع عن العمليات التي أجريتها.
نحن مستعدّون الآن وبعناصر HTML البسيطة هذه، أن نرتقي بموقعنا إلى مستوى أعلى. في البداية لنُضِف صورة بحيث تبدو الصفحة الرئيسية لمشروعنا أكثر جمالًا.

إدراج صورة

لإدراج صورة نستخدم العنصر <img>. المثال التالي سيُدرج صورة موجودة ضمن ملف اسمه marco.jpg:
<img src="marco.jpg" alt="Picture of me">
للعنصر <img> وسم فتح فقط ولا يوجد له وسم إغلاق. وهو يحتوي على سمتين src و alt. السمة src تُحدّد عنوان URL الذي يُعبّر عن اسم ملف الصورة ومساره. أمّا السمة alt فتمثّل النص البديل، وهو النص الذي يصف محتويات الصورة. يُستخدم هذا النص من قِبل محرّكات البحث، وفي حال تعذّر عرض الصورة ضمن الصفحة سيُعرض هذا النص بدلاً عنها.

1- عناوين URL النسبية والمطلقة

تُستخدم عناوين URL من أجل السمة src الخاصة بعنصر الصورة، وأيضاً من أجل السمة href الخاصة بعنصر الارتباط. يُحدّد عنوان URL عنوان (مسار) ملف، وبصورة عامة العنوان هو مصدر resource قد يكون صورة أو صفحة ويب من موقع آخر. بالاعتماد على موقع الملف نستخدم إمّا العنوان النسبي relative أو العنوان المطلق absolute.
فإذا كان الملف موجودًا ضمن نفس موقع الويب، عندها يمكن استخدام عنوان نسبي. فكما رأينا في المثال السابق اسم الملف وحده موجود دون عنوانه الفعلي (المطلق).
يكون عنوان URL من النوع النسبي، نسبيًا دومًا إلى صفحة HTML الحالية، فإذا كان الملف المستهدف وصفحة HTML التي ستستخدمه موجودان ضمن نفس المجلّد فعندها يكفي الإشارة إلى اسم الملف فقط، أمّا إذا كانا ضمن مجلّدين مختلفين فعندها يحب أن يؤخذ ذلك بعين الاعتبار.
فإذا فرضنا مثلًا أنّ ملف الصورة من المثال السابق موجودة ضمن مجلّد فرعي اسمه images سيكون عنوان URL النسبي لملف الصورةimages/marco.jpg. أمّا إذا كان ملف الصورة موجود ضمن المجلّد الأب، فيمكنك عندئذ الوصول إليه باستخدام البادئة ( /.. ) أي سيصبح عنوان الملف في هذه الحالة marco.jpg/.. 
أمّا إذا كان الملف موجوداً ضمن موقع ويب آخر، فعندها يجب استخدام عنوان URL مطلق. تحتوي عناوين URL المطلقة على الاسم والمسار الكاملين للملف. 
حقائق عن عناوين URL:
  • عنوان URL الذي يبدأ بـ //:http هو عنوان URL مطلق. 
  • عنوان URL بدون //:http هو عنوان URL نسبي بالنسبة إلى صفحة ويب الحالية. 
  • تُشير النقطة ( . ) إلى المجلّد الحالي. 
  • تُشير النقطتان ( .. ) إلى المجلّد الأب.
أمثلة عن عناوين ويب النسبية والمطلقة:
<!-- عناوين نسبية --> 
<a href="image-gallery.html">Image Gallery</a> 
<a href="blog/first-blog-entry.html">My First Blog Entry</a> 
<a href="../image-gallery.html">Back to Image Gallery</a> 

<!-- عناوين مُطلقة --> 
<a href="http://www.my-colleague.com/blog.html">Blog of a Colleague</a>

2- إضافة صورة إلى موقعنا

لندرج صورة ضمن الصفحة، ينبغي نسخ ملف الصورة إلى المجلّد Portfolio. من الممكن أن تستخدم نفس الصورة الموجودة مع هذا الدرس، أو أن تستخدم صورة من عندك، ولكن احرص في جميع الأحوال على أنّك ستُحدّد اسم الملف مع الامتداد بدقّة. يجب أن تحصل على شيفرة شبيهة بما يلي (لاحظ أنّني أضفت عناوين فرعية بالإضافة إلى مزيد النصوص):
الملف index.html مع الشيفرة اللازمة:
<!DOCTYPE html> 
<html> 
  <head> 
    <meta charset="utf-8"> 
    <title>Web Portfolio of Marco</title> 
  </head> 

  <body> 
    <h1>Web Portfolio of Marco</h1> 
    <h2>Welcome!</h2> 
    <p>Thanks for stopping by.</p> 
    <p>Please have a look around. In the blog section I document my experiences in programming. You may also look at my web projects. Have Fun.</p> 
    <img src="marco.jpg" alt="Picture of me"> 
    <p>Marco :-)</p> 
  </body> 
</html>
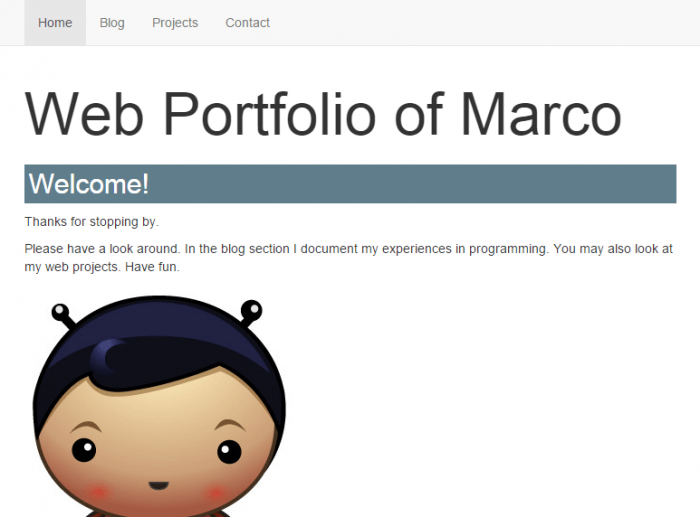
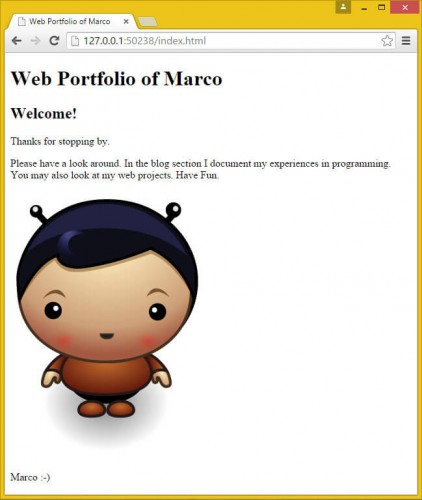
والصورة التالية لما ستبدو عليه الصفحة في متصفّح الويب: 
portfolio.thumb.jpg.b442df259a805d25fa7f
سنتعلّم في الدرس الثاني كيف ننشر موقعنا على الانترنت.

Part 2: Publishing Your Website


In the previous part you have created your first web site. It would be a pity if this website only stays on your computer and could never be looked at by anyone else. Therefore, we will now learn how to publish our website live on the internet.
Note: There will not be many visitors on your website right from the start. Unless you tell people about the address of your site they will probably not find it.

Hosting

What do we need that our website can be viewed on the Internet? We need a server where our website is stored and an address (URL) so that our website can be found on the server.
There are numerous services where you can rent server space. Such a service is called Webhosting. We will look at a few options for (free) hosting. My current favorite is Netlify.

Hosting on Netlify

Netlify Logo
Netlify is a wonderfully simple service which I highly recommend. Here’s how you can use it.
  1. Sign up on the Netlify website. Click on Sign Up and then choose Email. Enter your email address and a password.
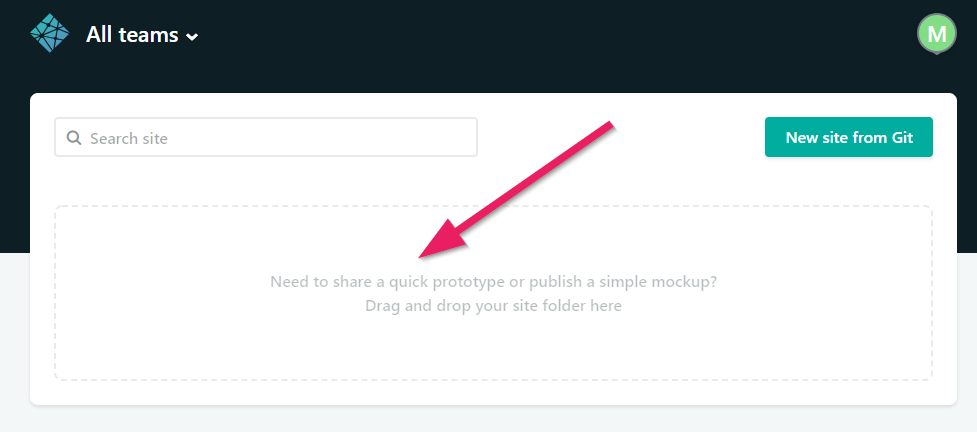
  2. Once you are logged in, you can simply drag your entire web folder (your Portfolio folder) in the provided space.
    Netlify Drag and Drop
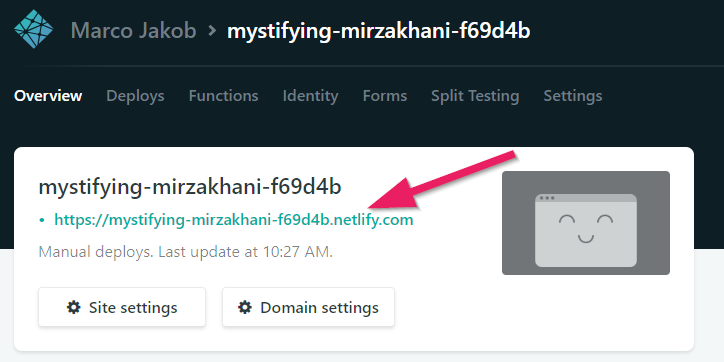
  3. Hard to believe, but that’s it. Once the page has been uploaded a URL is generated for you which points to your site. Click this URL and check whether the page is displayed correctly.
    Netlify Generated Website
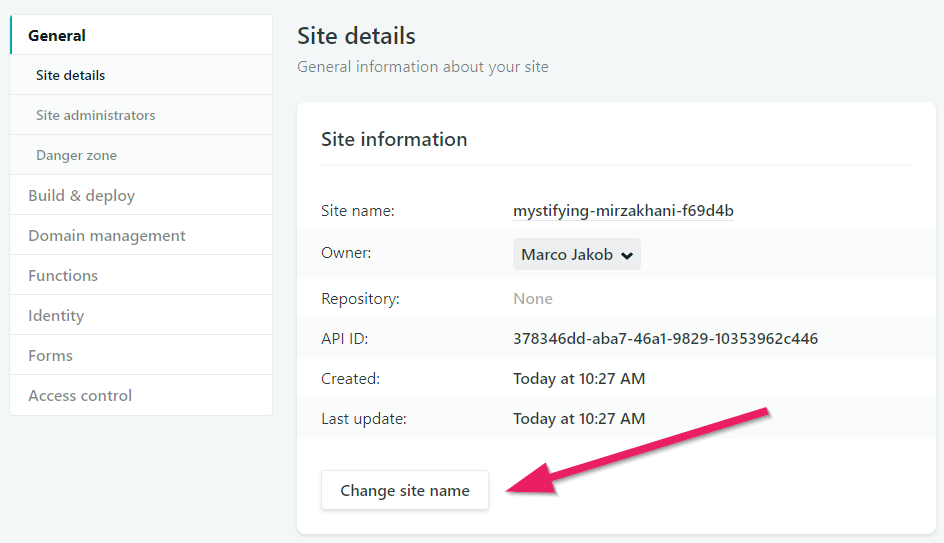
  4. To shorten your URL you can open Site settings click on Change site name and enter an arbitrary name.
    Netlify Change Site Name
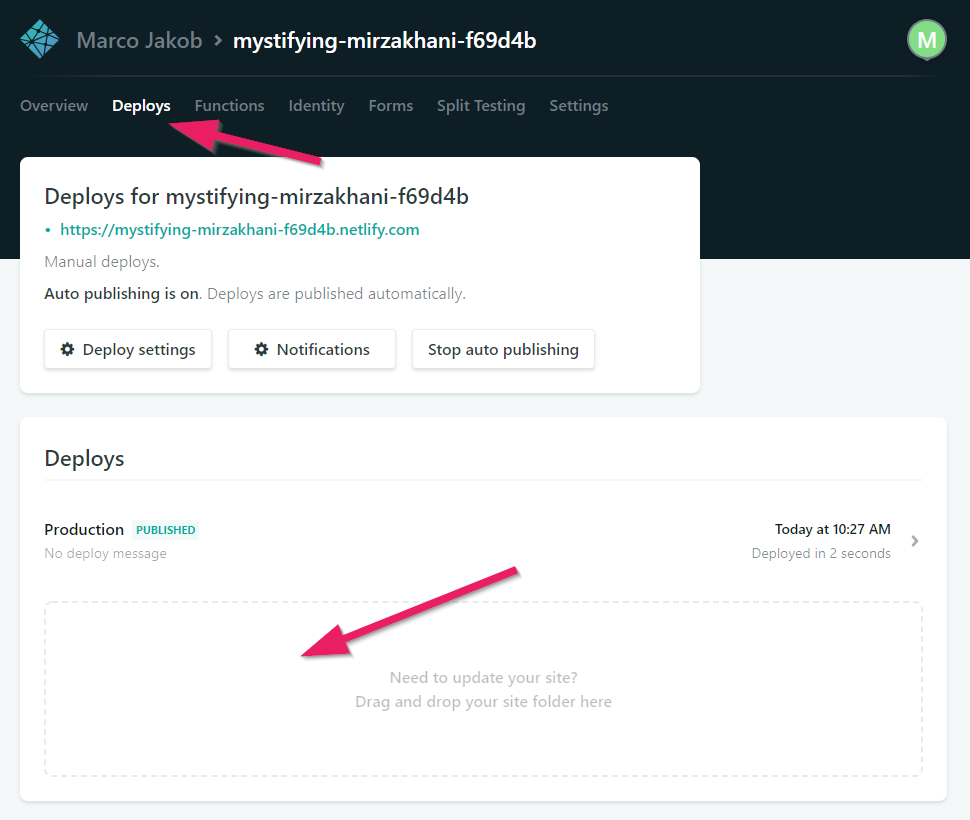
  5. For Updates: When you want to release a new version of your website open the Deploys menu and simply drag the folder into the box with the text Drag and Drop your site folder here.
    Netlify Change Site Name

Your Own Domain Name

There will come a time when you’ll want your very own domain name such as http://www.my-super-website.com. The only thing you will need to pay is the registration of a domain name (at an arbitrary domain registrar). This costs about 10$ per year. The hosting on Netlify is free.
When you have your own address, you can connect it with Netlify. To do this go to DomainsAdd custom domain in your Netlify settings.

Hosting on GitHub

GitHub Logo
If you already have some experience with programming then GitHub is a great way for web site hosting. GitHub is a platform to facilitate collaboration among programmers.
If you store your website on GitHub you can either connect GitHub and Netlify to publish the website or you can use GitHub Pages which is the GitHub’s own hosting service.

Part 1: Your First Website


Let’s dive right in and create our first web page.

Our Tools

For web development, you need two programs: an editor to create the files for the website and a browser(for example Edge, Firefox, Safari, or Chrome) to view and test your website.

Editor

For creating web pages, a normal text editor would be sufficient. But there are editors that greatly simplify your work as a programmer. Therefore, I recommend that you use a modern code editor.
Visual Studio Code Editor
My current favorite among the many editors is Visual Studio Code (free). You may use an editor of your choice but I will occasionally refer to some functions of Visual Studio Code (VS Code). Good alternatives are Atom or Brackets.
VS Code Editor Logo
Go ahead and install an editor. If you do not know which one, use Visual Studio Code for now.

Editor Extensions

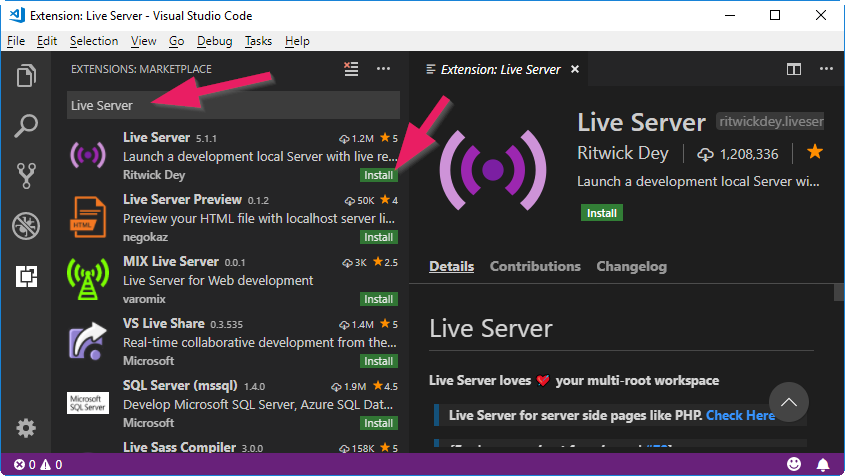
While we’re at it we’ll an extension to VS Code that will give superpowers to our editor: Live Server.
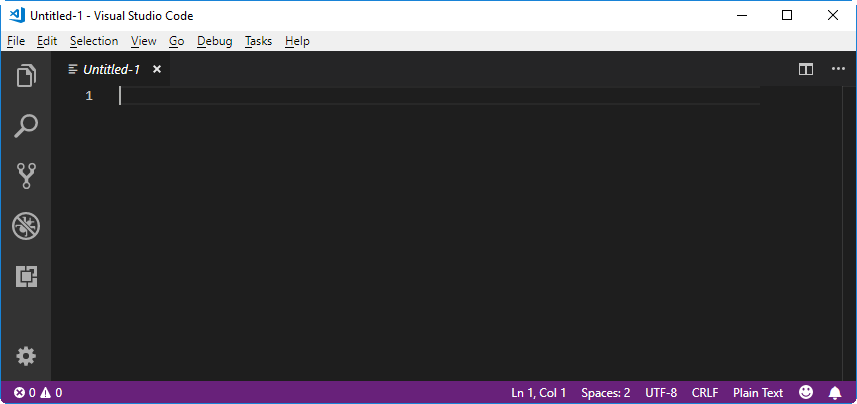
  1. Open Visual Studio Code.
  2. Open the menu “Extensions”.
    Open Extensions
  3. Type “Live Server” into the search field and install the extension.
    Install Live Server
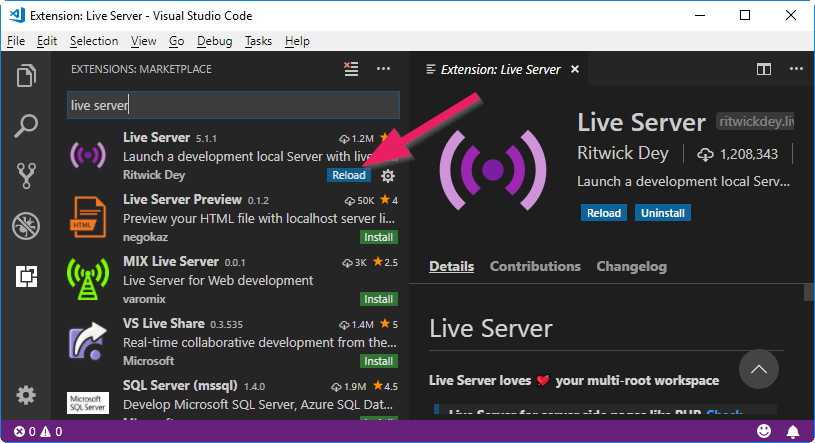
  4. Reload Visual Studio Code to activate the extension.
    Install Live Server Reload

Browser

Our website should, of course, run in all major browsers (Edge, Firefox, Chrome and Safari). However, for web development I recommend you use Chrome. Chrome includes very useful tools for developers which you will use often.
Chrome Logo
If you do not have Chrome on your computer, you can install it here.

Creating an HTML Document

Equipped with editor and browser, let’s create the first HTML document for our website.
  1. Create a folder on your computer for your project. Name the folder Portfolio (or anything you want).
  2. Open VS Code.
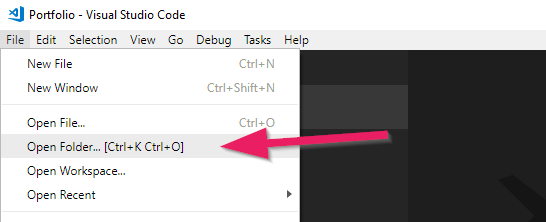
  3. Open the File menu and select Open Folder …. Browse for the folder you created and open it.
    Open Folder
  4. Right-click below the folder and select New File. Name the file index.html.
    New File
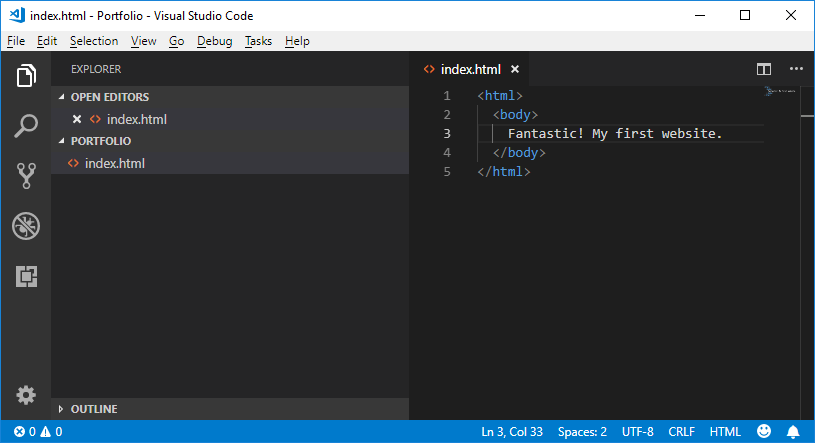
  5. Now you have a blank text file named index.html.
    index.html

Why index.html?

You could probably assume, the name index.html does have special meaning. If a website address is called, for example https://code.makery.ch, the index.html file is automatically displayed first, which in this case is https://code.makery.ch/index.html. For us, our first index.html will become our home page.

Viewing and Refreshing

Now you can fill the document with content. Type the following lines in your HTML.
HTML Structure
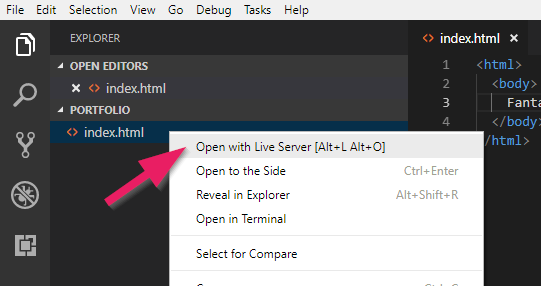
To view the page, we’ll use the Live Server extension that we installed above. Right-click on your index.html (the file below the Portfolio folder and not the one above under “Open Editors”). Then click Open with Live Server. A browser window should open up and show your first website. Now, whenever you save any changes they are automatically updated by the live server.
Start Live Server
If the page does not open in your preferred browser: Change the settings on your computer to make another browser your standard browser. Alternatively you can copy the address (for example http://127.0.0.1:5500/index.html) from one browser and insert it into another.
If the the page is not updated after changes: Save all your files in the editor and then - inside the browser - refresh with F5 or cmd+r.
Congratulations! You have just created your first website!

Indentation

In order to keep your code clean, it is important that you correctly indent the lines with the tab key. Pay close attention to the example code and indent accordingly. The browser does not care but it is important for us as programmers to be able to have a clear view.
Tip 1: Use Shift+Tab keys to move indentation to the left.
Tip 2: You can indent multiple lines at once if you select them and click Tab or Shift+Tab.
Tip 3 (automatically): Right-click somewhere in your program code and choose Format Document.

HTML Elements

Tags

In the above example you have already seen the typical HTML characters with angle brackets. These are called tags.
HTML elements consist usually (but not always) of two tags, one opening and one closing. In our example, <html> is an opening tag and </html> with the slash is a closing tag.
The text between the opening and the closing tag is the content of the HTML element. With <html> and </html> we tell the browser about the beginning and end of the HTML of our web page.
The second tag we have seen is the <body> tag. It states that all content between the opening <body> and the closing </body> tags are to be shown in the main area of the browser.

Attributes

Attributes declare additional information for an item. Attributes are part of the opening tag of an element and always have a name and a value.
As an example, let’s look at the HTML element for a link. It is probably one of the most important elements — what would the internet be without links?
HTML Element
The <a> element above includes an href attribute (short for “hypertext reference”) with the value https://code.makery.ch. The browser knows that it must show the link as My Website.

Basic Structure of an HTML Page

We have already seen the two elements <html> and <body>. But the basic structure of an HTML page usually contains a few more. Adjust your website to the following code. Afterwards, we will discuss each element it.
HTML Structure
<!DOCTYPE html>
<html>
  <head>
    <meta charset="utf-8">
    <title>Web Portfolio of Marco</title>
  </head>
  <body>
    <h1>Web Portfolio of Marco</h1>
    <p>Write anything you want to tell the world.</p>
  </body>
</html>

Explanations

  • Always put <!DOCTYPE html> on the first line. It tells the browser about the type of the document.
  • The <html> tag indicates the start and </html> the end of the document.
  • The <head> element contains additional information about the page. In contrast to the <body>element, this information does not appear in the main area of the browser.
    • Within the <head>, there should be an indication about the character set: <meta charset="utf-8">. If you do not specify the character set some special characters may not get displayed correctly. You might have noticed that the <meta> element has no closing tag. There are a few elements without closing tags (<br><img>, etc.), but they are the exception.
    • Next you’ll see the <title> element. The title is displayed in the title bar at the top of your browser window.
  • Everything inside the <body> element is displayed in the main area of the browser.
    • <h1> defines the main heading. Sub headings can be created with <h2><h3><h4><h5>, and <h6>.
    • Text between <p> and</p> is a paragraph.
  • After each opening tag, the next element should be indented (with a tab or two spaces) for better overview. Make sure you follow this habit.
Tip 1: Keep this basic HTML structure handy. You can use it for any new HTML page!
Tip 2: Use the keyboard shortcut Ctrl+S to save the current file.
Tip 3: Use the keyboard shortcut Ctrl+Z for undo.
With these basic HTML elements we are well prepared to bring our website to a new level. First, let’s add an image so that the home page of our portfolio looks a bit more interesting.

Inserting an Image

To insert an image we use the <img> element. The following example will insert my picture:
<img src="marco.jpg" alt="Picture of me">
The <img> element only has one opening but no closing tag. It contains a src and an alt attribute. The src attribute specifies the URL, that is the location and file name of the image. The alt attribute is an “alternative text”, which describes the content of the image. This text is used by search engines and if for some reason the image can not be displayed, for example on a screen reader for the blind.

Relative and Absolute URLs

URLs are used for the src attribute of images and also for thehref attribute of links. The URL specifies the “address” of a file (for example another web page or an image). Depending on the location of the file, either a relative or absolute URL must be used.
If a file is part of the same web site, then a relative URL can be used. As we have seen in the example above, this is only the name of the file.
relative URL is either relative to the current HTML page or relative to the root of our website. To reference a file in the same folder, we can just use the filename like marco.jpg. If the target file is located in another folder, this must be taken into account. If the image from the example above were in a subfolder called images, the relative URL would be images/marco.jpg. If the file is in a parent folder you can reach it with ../. The URL for the image in this case would be ../marco.jpg.
Instead of navigating from the current file we can also start from the root of our website by adding a leading slash /marco.jpg. We can use this from any file in your website and in any subfolder and it will always start at the root. This is helpful for navigation links as we will see in a following part of the tutorial.
If the file is located on another website, an absolut URL must be used. Absolute URLs contain the entire domain name and path. An example would be https://code.makery.ch/images/marco.jpg.
Remember the following about URLs:
  • Inside the same folder we just use the filename, for example marco.jpg
  • Two dots (`..`) refer to the parent directory.
  • If we want to start in the root directory we add an `/` before the path of the file, for example /marco.jpg.
Examples of Relative and Absolute URLs
<!-- Relative URLs -->
<a href="image-gallery.html">Image Gallery</a>
<a href="blog/first-blog-entry.html">My First Blog Entry</a>
<a href="../image-gallery.html">Back to Image Gallery</a>

<!-- Absolute URLs -->
<a href="http://www.my-colleague.com/blog.html">Blog of a Colleague</a>

Portfolio with an Image

If you have not already done so, try and insert an image in your portfolio. You must copy an image to your Portfolio folder on your computer. Make sure that you specify the exact file name, including the file extension.
All of your code could now look something like this (I’ve added a subheading and some more text):
index.html with Finished Portfolio Code
<!DOCTYPE html>
<html>
  <head>
    <meta charset="utf-8">
    <title>Web Portfolio of Marco</title>
  </head>
  <body>
    <h1>Web Portfolio of Marco</h1>

    <h2>Welcome!</h2>

    <p>Thanks for stopping by.</p>

    <p>Please have a look around. In the blog section I document my experiences in programming. You may also look at my web projects. Have Fun.</p>

    <img src="marco.jpg" alt="Picture of me">

    <p>Marco :-)</p>
  </body>
</html>
That’s how the portfolio currently looks like in the browser:
Portfolio

What’s next?

→ In the next section you will learn how to publish your website on the internet. Continue with Part 2: Publishing Your Website